(+86)-15659131976
Hot Keywords:
- All
- Product Name
- Product Keyword
- Product Model
- Product Summary
- Product Description
- Multi Field Search
English

 |


SPM1
AIDARY
According to history chronicles, screen printing started thousands of years ago inChina. Believe you me; there was a period where screens used for this machine were made from hair!
Since then, the machine has undergone massive improvements to the present day screen printing device we all know. If you want to get a superior printing quality on your garments, screen printing is the way to go. If you want to do mass productions, again you should consider screen printing.
Using the system might be intimidating at first, but it’s easier than you think! You can familiarize yourself with this machine in no time and start using it to work on your customers’ orders.
We’ll show you can do that in a few moments.
Screen printing at home works like a stencil. Rather than cutting the images individually, you simply coat the screen in a photo emulsion and then cut the image out using a laser.
Let’s get into our expert guide on how to do screen printing:
The initial step in screen printing involves coming up with an image. The artwork is important for your overall printing process! If you create a bad design, the coating will be no good; screens will be no good; and your shirts will be no good. Be sure to produce high-resolution images.
Most screen printers require at least 300 dots per inch (DPI) art. The higher your resolution is, the more dots available per inch, and the better your image becomes.
Why high-resolution image? Because it’s easier to prepare for screen printing, keeping in mind that you’ll need to separate each color in the design into individual files, layers, and channels.
Once your image is ready, move on to step two…
This is self-explanatory ad involves removing the individual colors from your design in other words if your design features some red text and some green text, each portion of these colors will be separated from each other and printed on a film (or vellum- a cheaper alternative).
The film is the most preferred material as it makes a higher quality output, enabling the screen exposure process to produce better dots and lines- that’s our next step!
When your screens are ready for burning, you can now take them to the exposure unit. In the simplest terms, an exposure unit is a box featuring lights on the inside. Although you might encounter different units with different features and capabilities, they’ll share a similar functionality.
Your film will be placed in between the exposures glass and the screen. This allows light to shine up (or down for some units) through your glass, through the film, and against the screen. Wherever the light fails to hit your screen, your emulsion will juts wash right out.
An emulsion is simply a photosensitive liquid that you apply to the screen before the exposure process. You typically apply it with a squeegee so that it covers so that it covers most parts of your screen. When the emulsion is dry, you store the screen in a dark room for around 2 hours to prepare it for burning/separation.
At this stage, your screen(s) is ready for printing. To set them up for printing, you apply them in the best order based on the printer knowledge. Placing your screens in the correct order for printing is crucial as it enables the ink to be applied on your apparel correctly.
After you’ve set up your screens on the press, you must “register” them. That is, you’ll take each screen and line them up so that they all print their contents. The registration process should be conducted with great care as it determines the outcome of your garment.
Afterward, apply ink to each screen. Depending on your job, you might need to add a couple of squeegees or more. You’ll also need to measure out or mix some inks to obtain certain colors.
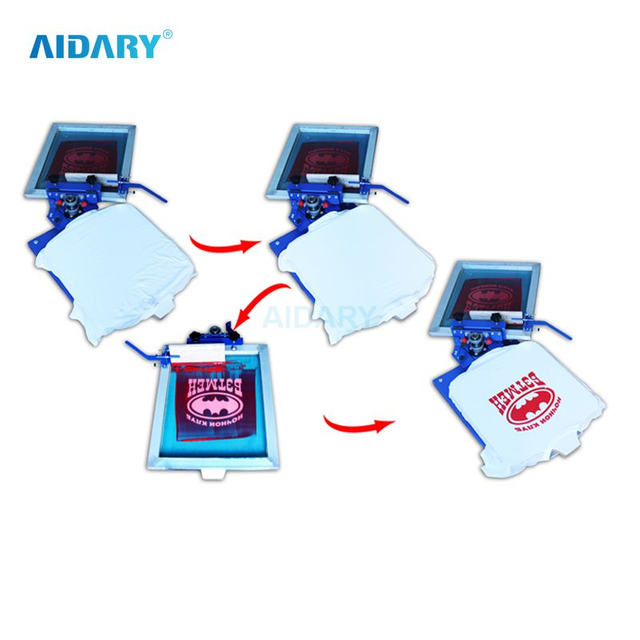
Now that everything is ready to go, you can proceed to print your items. If you’ve medium to large runs, you can just do them on the auto press- this will depend on the system you’re using. An auto press is much like a carousel that automatically spins and applies ink.
For smaller runs, you can use a manual press which employs the same concept, only that you’ll implement the ink manually using a squeegee.
Screen printing is the most popular method of t-shirt printing (not forgetting it’s also the oldest). The fact that it has existed for all those years and still popular means it’s a highly reliable method that gives you nothing but the best quality.
If you’re planning to set up a garments screen printing business, the above guide will help you familiarize yourself with how to screen print shirts at home.
And before long, you’ll become an expert operator.
Good luck!
According to history chronicles, screen printing started thousands of years ago inChina. Believe you me; there was a period where screens used for this machine were made from hair!
Since then, the machine has undergone massive improvements to the present day screen printing device we all know. If you want to get a superior printing quality on your garments, screen printing is the way to go. If you want to do mass productions, again you should consider screen printing.
Using the system might be intimidating at first, but it’s easier than you think! You can familiarize yourself with this machine in no time and start using it to work on your customers’ orders.
We’ll show you can do that in a few moments.
Screen printing at home works like a stencil. Rather than cutting the images individually, you simply coat the screen in a photo emulsion and then cut the image out using a laser.
Let’s get into our expert guide on how to do screen printing:
The initial step in screen printing involves coming up with an image. The artwork is important for your overall printing process! If you create a bad design, the coating will be no good; screens will be no good; and your shirts will be no good. Be sure to produce high-resolution images.
Most screen printers require at least 300 dots per inch (DPI) art. The higher your resolution is, the more dots available per inch, and the better your image becomes.
Why high-resolution image? Because it’s easier to prepare for screen printing, keeping in mind that you’ll need to separate each color in the design into individual files, layers, and channels.
Once your image is ready, move on to step two…
This is self-explanatory ad involves removing the individual colors from your design in other words if your design features some red text and some green text, each portion of these colors will be separated from each other and printed on a film (or vellum- a cheaper alternative).
The film is the most preferred material as it makes a higher quality output, enabling the screen exposure process to produce better dots and lines- that’s our next step!
When your screens are ready for burning, you can now take them to the exposure unit. In the simplest terms, an exposure unit is a box featuring lights on the inside. Although you might encounter different units with different features and capabilities, they’ll share a similar functionality.
Your film will be placed in between the exposures glass and the screen. This allows light to shine up (or down for some units) through your glass, through the film, and against the screen. Wherever the light fails to hit your screen, your emulsion will juts wash right out.
An emulsion is simply a photosensitive liquid that you apply to the screen before the exposure process. You typically apply it with a squeegee so that it covers so that it covers most parts of your screen. When the emulsion is dry, you store the screen in a dark room for around 2 hours to prepare it for burning/separation.
At this stage, your screen(s) is ready for printing. To set them up for printing, you apply them in the best order based on the printer knowledge. Placing your screens in the correct order for printing is crucial as it enables the ink to be applied on your apparel correctly.
After you’ve set up your screens on the press, you must “register” them. That is, you’ll take each screen and line them up so that they all print their contents. The registration process should be conducted with great care as it determines the outcome of your garment.
Afterward, apply ink to each screen. Depending on your job, you might need to add a couple of squeegees or more. You’ll also need to measure out or mix some inks to obtain certain colors.
Now that everything is ready to go, you can proceed to print your items. If you’ve medium to large runs, you can just do them on the auto press- this will depend on the system you’re using. An auto press is much like a carousel that automatically spins and applies ink.
For smaller runs, you can use a manual press which employs the same concept, only that you’ll implement the ink manually using a squeegee.
Screen printing is the most popular method of t-shirt printing (not forgetting it’s also the oldest). The fact that it has existed for all those years and still popular means it’s a highly reliable method that gives you nothing but the best quality.
If you’re planning to set up a garments screen printing business, the above guide will help you familiarize yourself with how to screen print shirts at home.
And before long, you’ll become an expert operator.
Good luck!